There are several places in FontCreator that allow you to preview your font, the most obvious places are the Preview panel, the preview area in the OpenType Designer, but you can also use the Text tool within a glyph panel.
On the upper right side there are two fields which allow you to set the size of the text and the text itself. To force a line-break in the preview area, enter “/newline” in the preview text.
The preview is not a full blown OpenType text shaping engine, but is still extremely useful while testing your font, metrics, kerning and other OpenType layout features it contains.
Shaping Engine
The preview is not a full blown OpenType text shaping engine, but is still extremely useful while testing your font, metrics, kerning and other OpenType layout features it contains. Use Test Desktop Font to see how your font behaves in Windows, and use Test Web Font to test it in your default Web browser.
You can choose which features need to be active, so only those will be used to shape the text within the preview area. You can also choose to use a more advanced Shaping Engine, which behaves more like other software like Microsoft Word, Adobe InDesign, Serif Affinity Designer, and web browsers. To enable it, check the feature named “_shaper”. This will trigger (basic) normalization and will then process specific features in a fixed order, even if they are not selected, and after that it will process all remaining active features.
Note: The engine first splits the provided text into runs, so each run contains a different script. Therefor OpenType layout features won't work between different scripts.
The shaping engine will process the following features for glyph substitution:
locl, ccmp, nukt, akhn, rphf, pref, rkrf, abvf, blwf, half, pstf, vatu, cjct, isol, init, medi, fina, abvs, blws, calt, clig, haln, liga, pres, psts, rclt, rlig, vert, vrt2.
and these for glyph positioning:
curs, dist, kern, mark, abvm, blwm, mkmk.
Some of the above features will only be applied if the specific glyphs do match the meaning of the feature. For example isol will only be processed if the input glyph is in an isolated form within the given text.
Tip: use the proofing window to analyze and inspect OpenType layout features that apply to the current preview text.
Note: if the _shaper is enabled, it will continue to process the features as explained earlier in this paragraph.
Preview Text
You can type a line of text, but you can also use special formatting to include unmapped glyphs, new line, etc as discussed below.
Include Glyph by Name
You can type a slash followed by a glyph name, which is especially useful when a glyph is unmapped. You can add a space or backslash immediately after it, so the next character can be interpreted as a next letter.
For example /one/two\a will show 12a
Include Glyph by Code-point
You can type a slash followed by a Unicode code-point in either hexadecimal or decimal notation. So for the @ sign you can type these:
/$40
/64
Include Slash
It requires some special attention to get a slash in the preview, as the slash is used to add a glyph by name and code-point. You can either type two slashes, or use glyph by name or glyph by code-point, so all of these should work:
//
/slash
/47
/$2F

Force New Line
To force a line-break in the preview area, enter “/newline” in the preview text.
Activate features for parts of the preview text
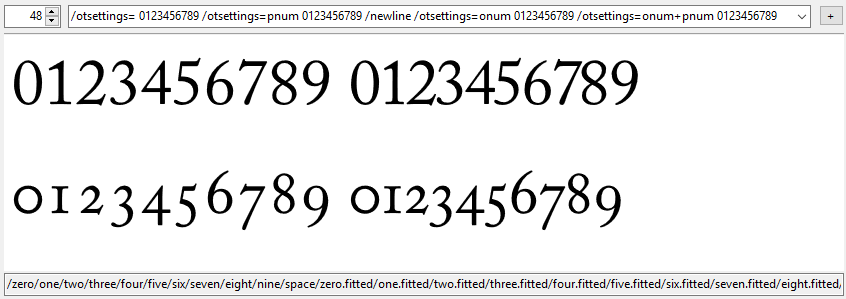
The preview text allows you to enable and disable features for subsequent text. This allows you to test several feature combinations at once, so for example you can compare how small capitals behave with and without kerning applied. It also allows you to compare the way lining and oldstyle figures work with tnum or pnum enabled.
Within the preview text provide “/otsettings=” to override or “/otsettings+” to enable and disable features. For example:
/otsettings= 0123456789 /otsettings=pnum 0123456789 /newline /otsettings=onum 0123456789 /otsettings=onum+pnum 0123456789